
Sending emails using Amazon SES with AWS Lambda
Sending emails is something you've probably done thousands of times in your life to the point where you don't even have to think about it. Well what about doing programatically in your AWS backend? Takes a bit more configuration than you might think.
This article will go over how to set up a Lambda Function that can send emails using a verified domain that you own in Route53, complete with DKIM signing and a custom MAIL FROM domain to ensure your emails have the hightest chance of reaching their destinations.
Step 1: Set up our CDK Project
In your directory, run the following command to generate a new CDK project. I'm calling my project email-sender but feel free to call yours whatever you like.
mkdir email-sender
cd email-sender && cdk init app --language typescript
In our lib/email-sender-stack.ts file, let's add the following parameters and resources to our stack:
import * as cdk from "aws-cdk-lib";
import { Construct } from "constructs";
import * as route53 from "aws-cdk-lib/aws-route53";
import * as ses from "aws-cdk-lib/aws-ses";

export interface EmailSenderStackProps extends cdk.StackProps {
  sourceEmailAddress: string;
  hostedZone: {
    id: string;
    name: string;
  }
}

export class EmailSenderStack extends cdk.Stack {
  constructor(scope: Construct, id: string, props: EmailSenderStackProps ) {
    super(scope, id, props);

    const {
      sourceEmailAddress,
      hostedZone
    } = props;

    const zone = route53.HostedZone.fromHostedZoneAttributes(
      this,
      `HostedZone`,
      {
        hostedZoneId: hostedZone.id,
        zoneName: hostedZone.name,
      }
    );

    new ses.EmailIdentity(this, 'emailIdentity', {
      identity: ses.Identity.publicHostedZone(zone),
      // NOTE: the mailFromDomain HAS to end with a "." or you will end up
      // creating a weird record with a name like mail.example.com.example.com
      mailFromDomain: `mail.${zone.zoneName}`,
    });
}
What's nice about using this built-in EmailIdentity is that it automatically handles all of the Route53 record creation for you, all you have to do is give it the zone information which we are passing in through our stack parameters.
NOTE: this assumes that you want your MAIL FROM domain for your site to be the mail subdomain of whatever domain name your hosted zone is for. So if your zone was for example.com, your MAIL FROM domain would be mail.example.com. IF you don't care about sending emails from your own domain and would rather use the SES defaults, you can omit the mailFromDomain property from your EmailIdentity configuration.
Let's also update bin/email-sender.ts to pass in our stack properties, replacing the email address and hosted zone information with your own:
#!/usr/bin/env node
import "source-map-support/register";
import * as cdk from "aws-cdk-lib";
import { EmailSenderStack } from "../lib/email-sender-stack";

const app = new cdk.App();
new EmailSenderStack(app, "EmailSenderStack", {
  sourceEmailAddress: "me@example.com",
  hostedZone: {
    name: "example.com",
    id: "ABCDEFGHIJK"
  }
});
Sweet, on to the next step!
Step 2: Define our Lambda function
In our command line, let's add the SES Client so that our lambda function can import it and use it to send emails:
npm install @aws-sdk/client-ses
Below where we defined our ses.EmailIdentity, let's add a new Lambda Function definition that we can call to send our emails:
// add these new imports
import * as iam from "aws-cdk-lib/aws-iam";
import * as lambda from "aws-cdk-lib/aws-lambda-nodejs";
import { Runtime } from "aws-cdk-lib/aws-lambda";
import path = require("path");

export class EmailSenderStack extends cdk.Stack {
  constructor(scope: Construct, id: string, props: EmailSenderStackProps ) {
    ... // previous stuff
    const emailSender = new lambda.NodejsFunction(this, "emailSender", {
      runtime: Runtime.NODEJS_18_X,
      entry: path.resolve(__dirname, "./emailSender.ts"),
      environment: {
        SOURCE_EMAIL_ADDRESS: sourceEmailAddress
      },
    })

    // give our lambda permission to send emails in SES
    emailSender.addToRolePolicy(new iam.PolicyStatement({
      actions: ['ses:SendEmail', 'SES:SendRawEmail'],
      resources: ['*'],
      effect: iam.Effect.ALLOW,
    }));
}
Now let's create a new file in our lib folder called emailSender.ts and make it look something like this:
import { SendEmailCommand, SESClient } from "@aws-sdk/client-ses";

interface EmailSenderEvent {
  email: {
    title: string;
    body: string;
  }
  destinationEmailAddress: string;
  replyToEmailAddress: string;
}

const sourceEmailAddress = process.env.SOURCE_EMAIL_ADDRESS;

export const handler = (event: EmailSenderEvent) => {
  const {
    destinationEmailAddress,
    replyToEmailAddress,
    email: { title, body },
  } = event;

  await emailClient.send(new SendEmailCommand({
    ReplyToAddresses: [ replyToEmailAddress],
    Source: sourceEmailAddress ,
    Destination: {
      ToAddresses: [destinationEmailAddress]
    },
    Message: {
      Subject: {
        Data: title
      },
      Body: {
        Text: {
          Data: body
        }
      },
    }
  }))

  return {
    success: true,
  };
};
Step 3: Deploy and Verify
You should be all set! Run cdk deploy in your project to deploy your new email configuration and email sender Lambda function.
NOTE: your first deployment of this stack may take a while because of the Route53 records that have to be created to enable DKIM validation and your custom MAIL FROM domain. This process usually takes about 3-5 minutes in my experience.
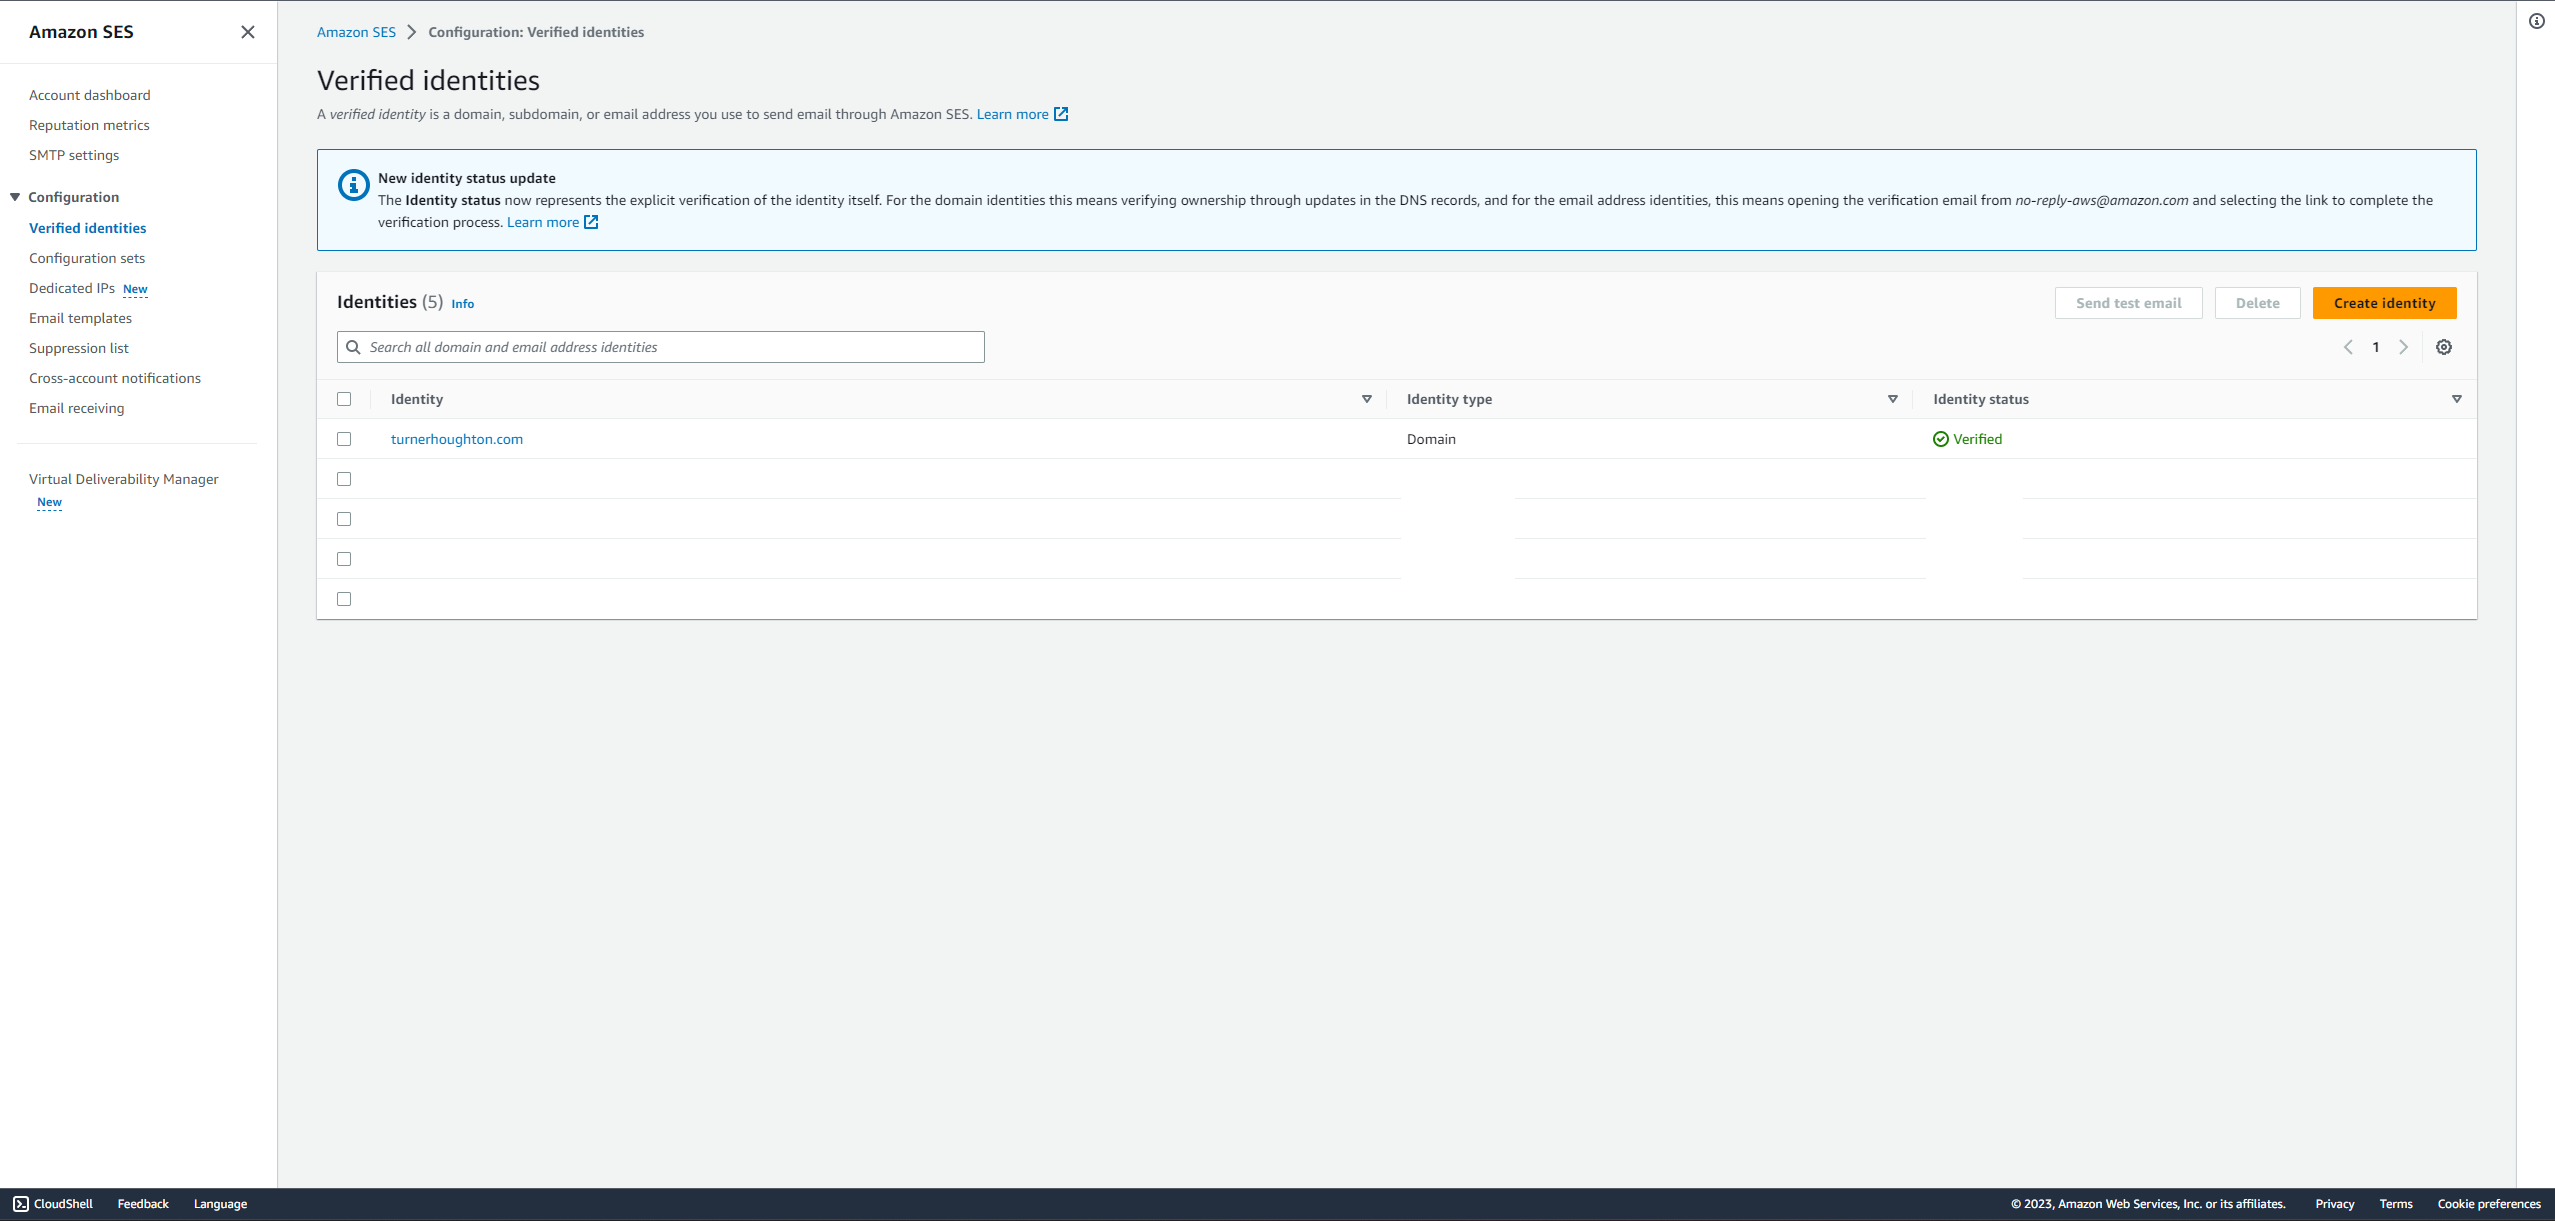
Once everything has successfully deployed you should be able to see your new verified domain in the SES console:
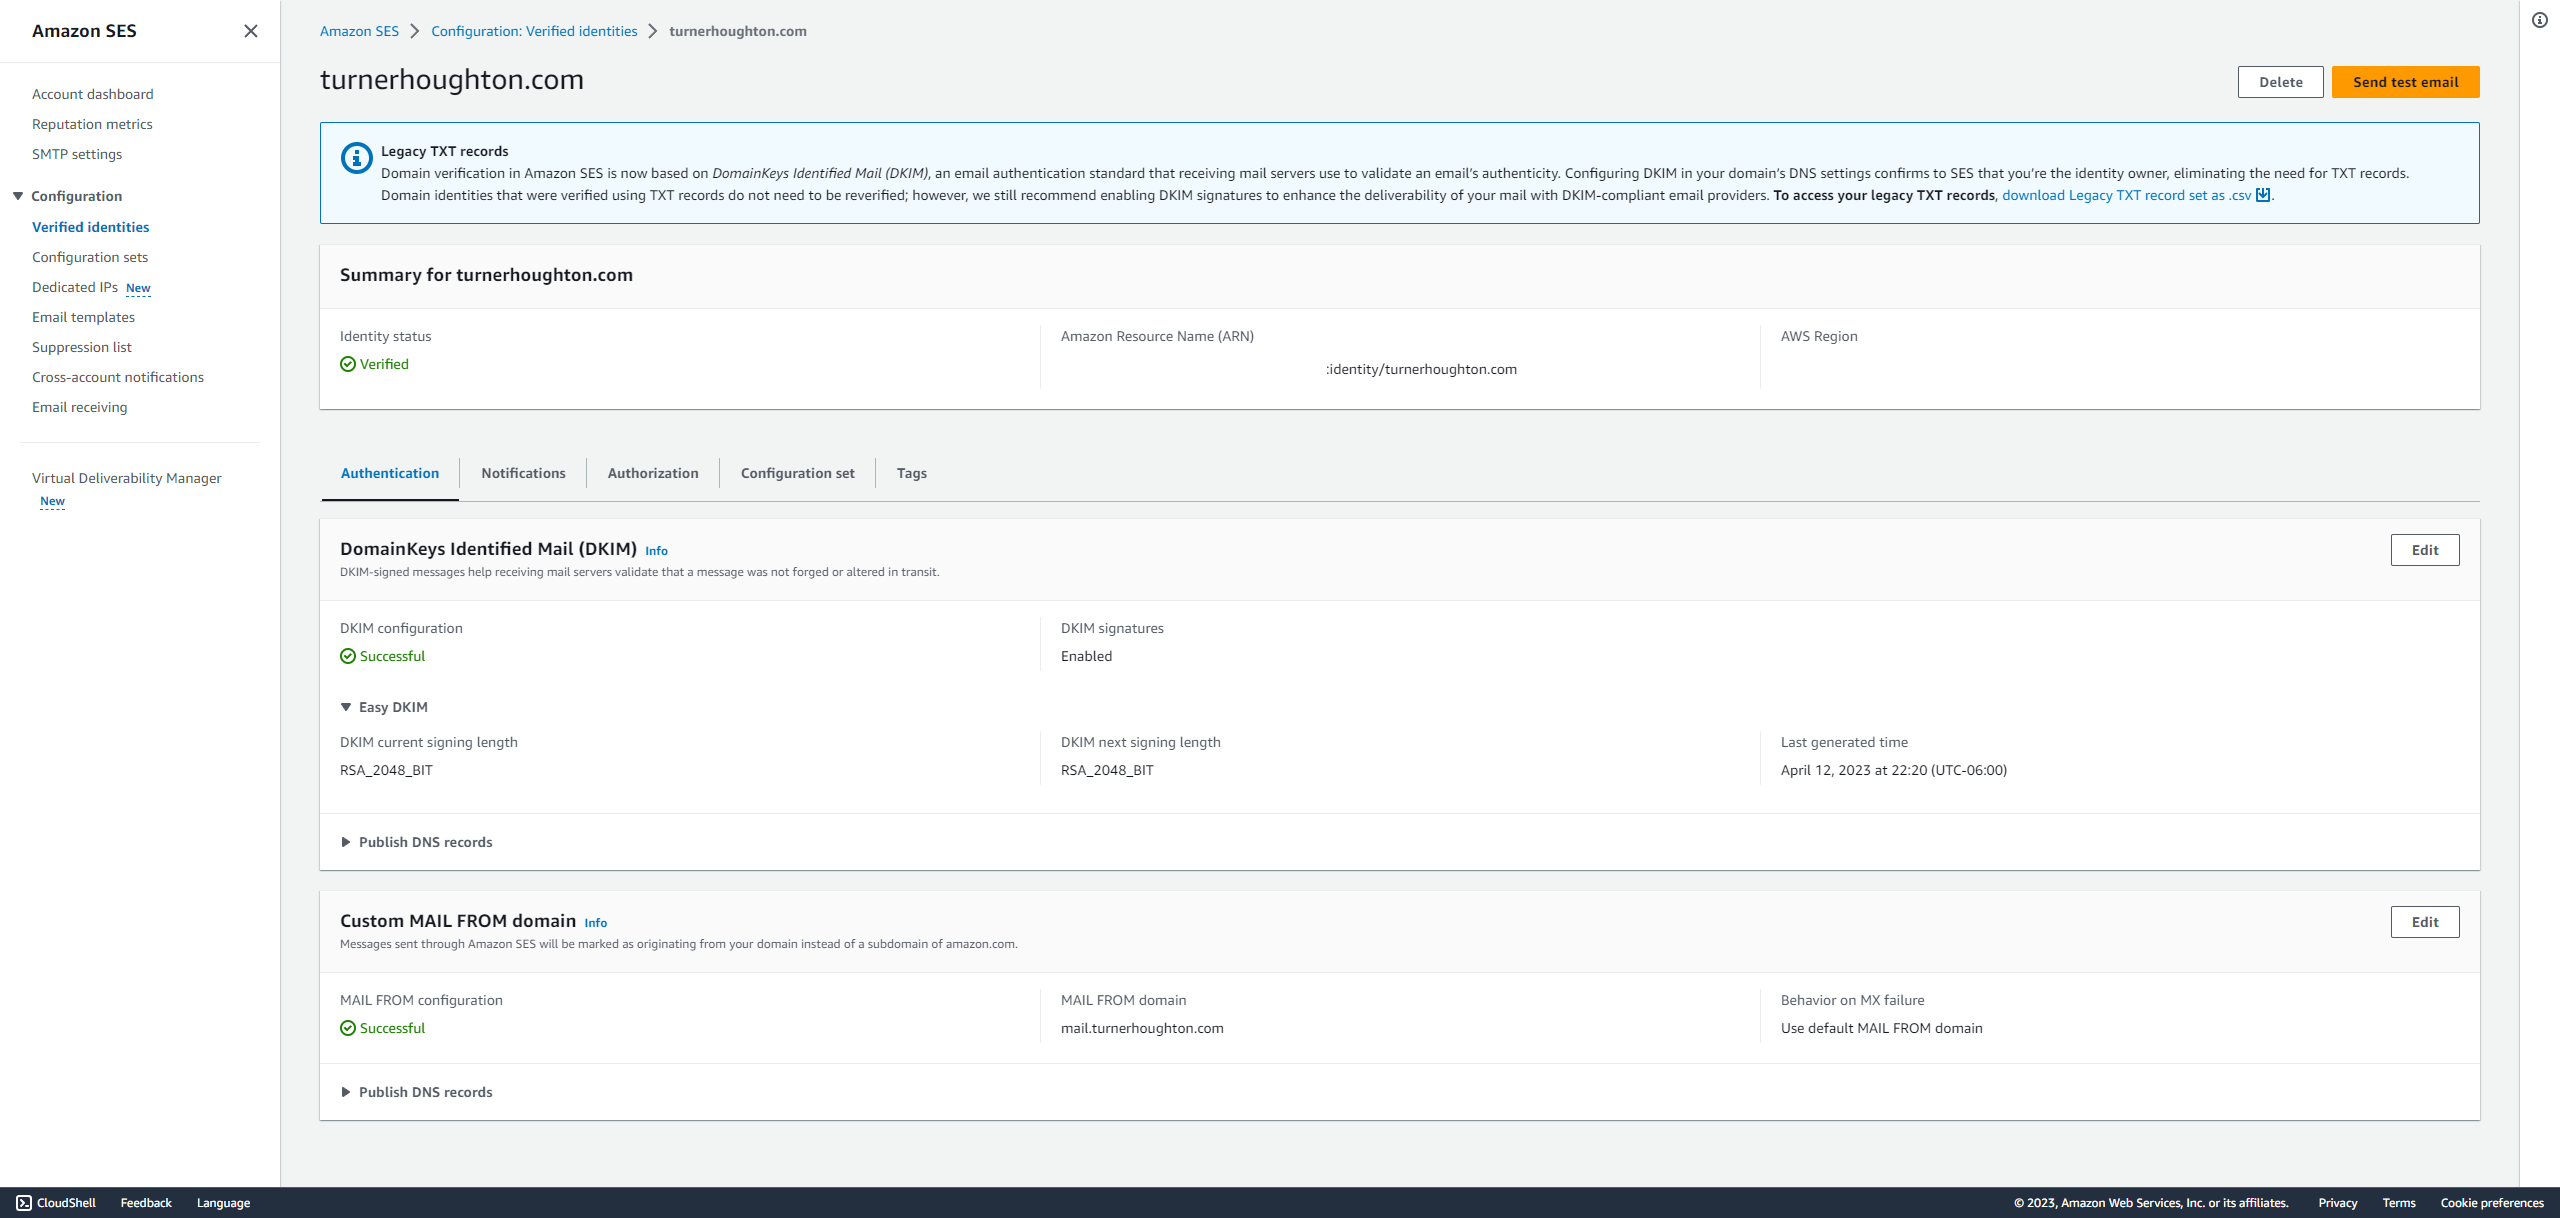
And if you click on that domain, you should be able to verify that DKIM and your MAIL FROM domain were set up successfully:
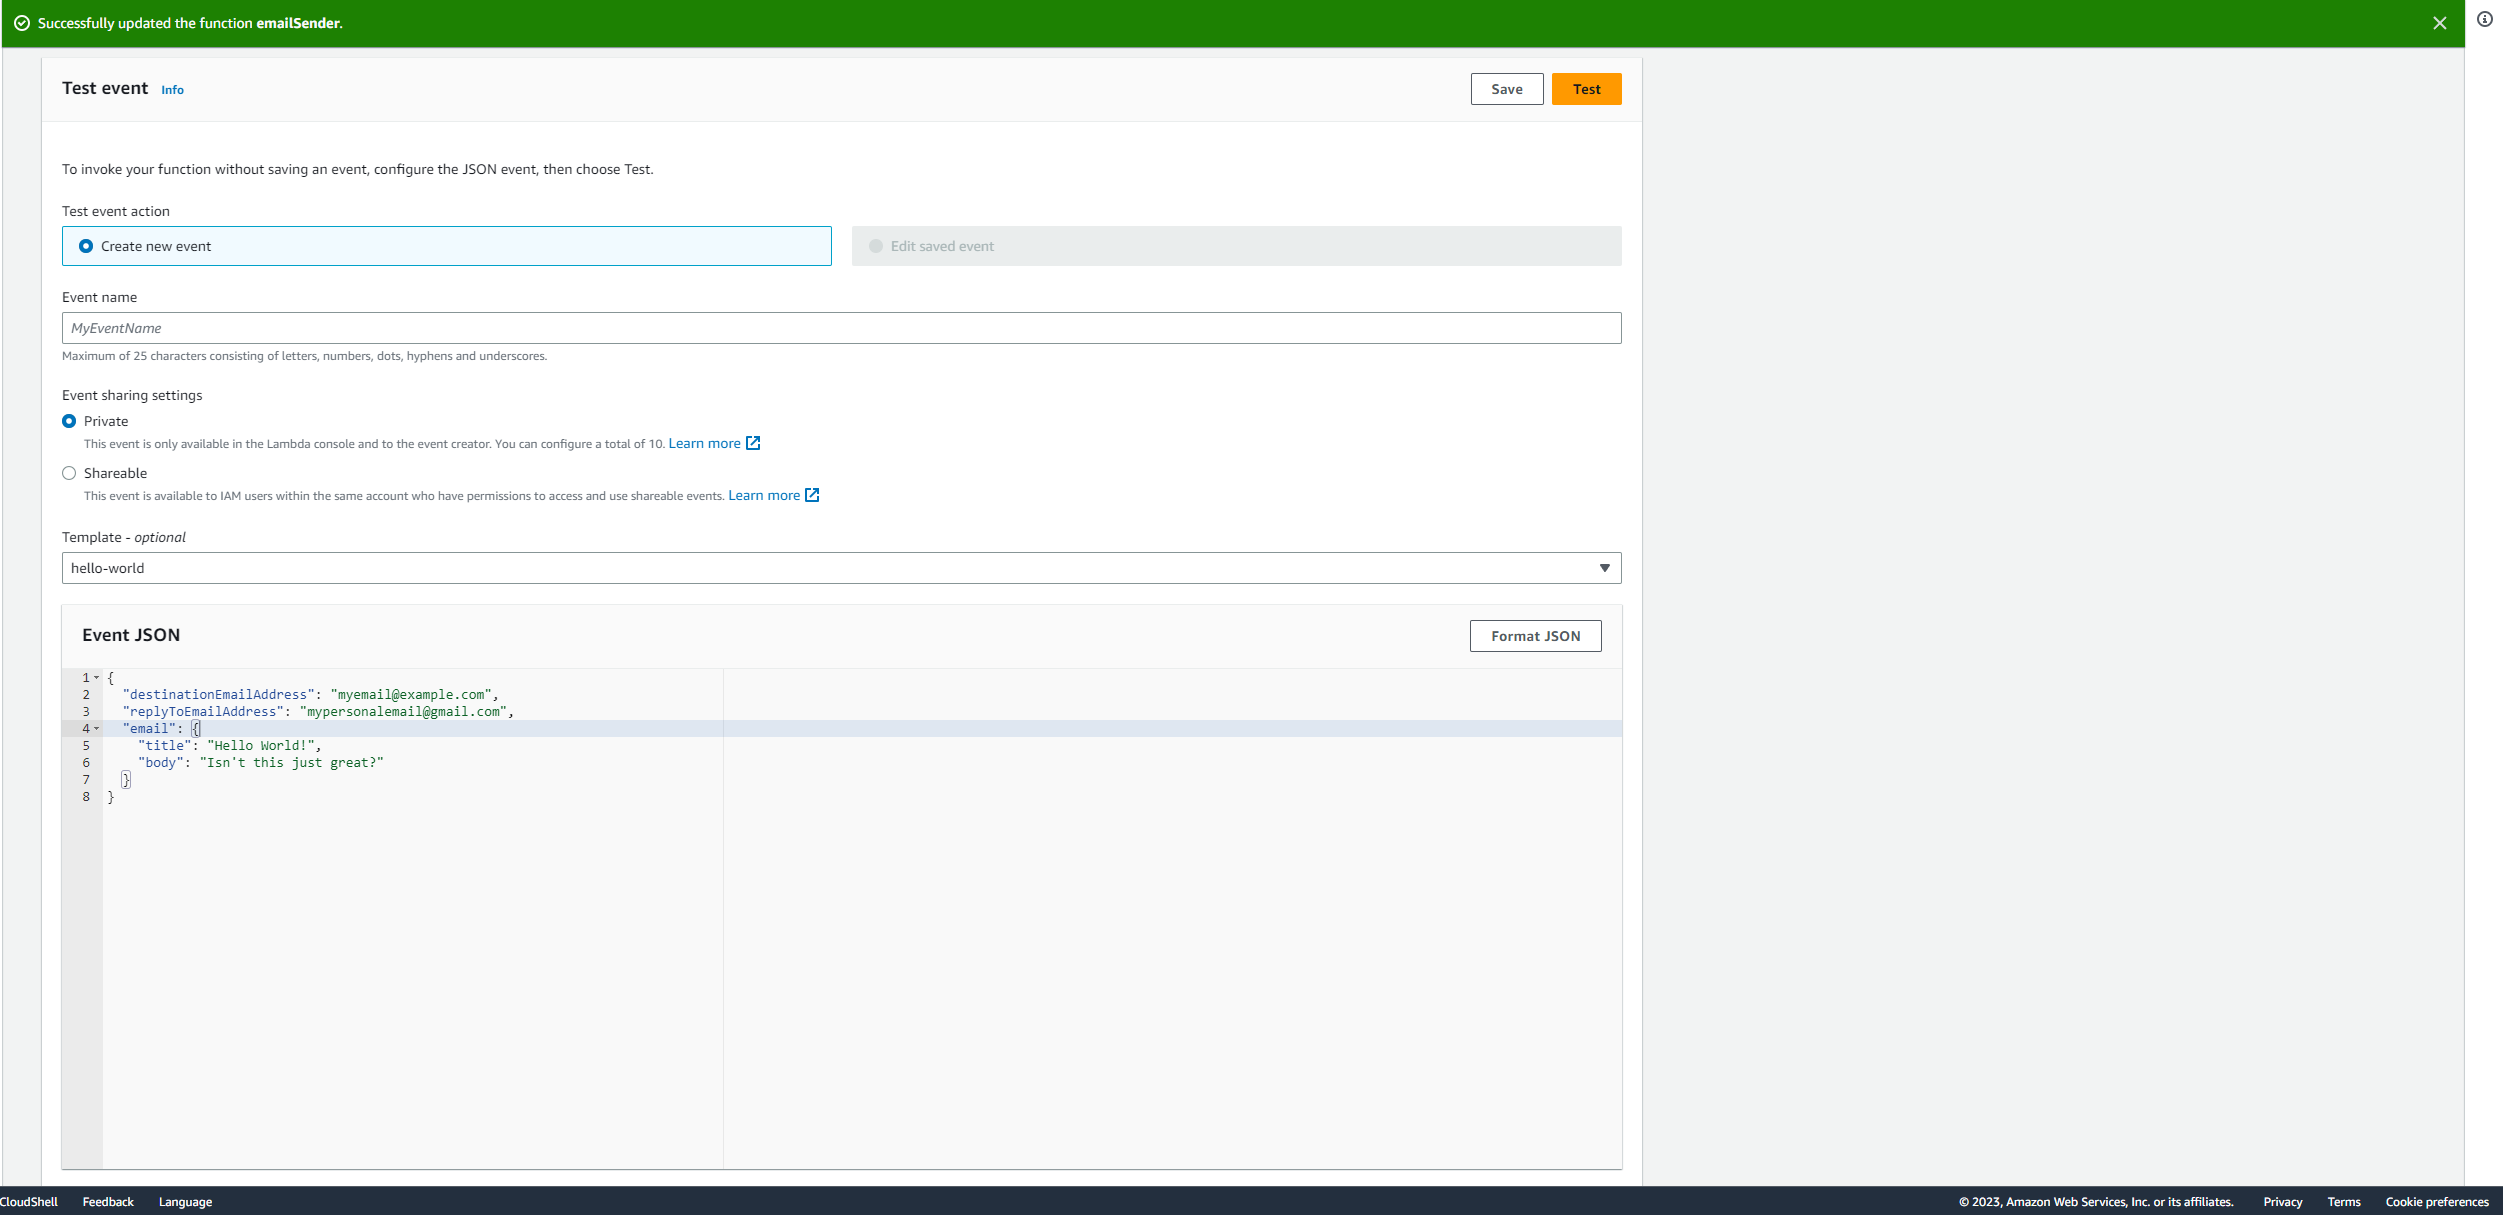
And finally we can verify that our deployed lambda works by sending it the following test event in the Lambda console, replacing the placeholder emails with actual ones:
{
  "destinationEmailAddress": "myemail@example.com",
  "replyToEmailAddress": "mypersonalemail@gmail.com",
  "email": {
    "title": "Hello World!",
    "body": "Isn't this just great?"
  }
}
NOTE: SES starts out in test mode, meaning that you can only send emails to verified email addresses. To test out the email sending functionality, you will need to either verify your email address you wish to send to (in this case, myemail@example.com) or you will need to contact AWS Support to have them set SES to production mode for you.
Click on "Test" and then verify your function returns successfully. You can also check your email inbox to verify that the email actually showed up!
Step 4: Give yourself a high five!
That's all there is to it! You can customize the logic in your lambda function to send to multiple email addresses at the same time. You can even hook up this logic to a form you may have on your website to easily direct clients or customers to contact you through a preferred email address.